An anonymous poster just made a comment about a great way of cooking a rice meal out in the field using very little fuel (check the comments section for the "One Bucket Per Month Challenge" post). It reminded me of a post I did on my old site about building a Rocket Stove.
Enjoy.
---
I've been researching different way of cooking in an emergency situation. I carry a homemade Penny Stove in my GHB. They are excellent for this purpose - small, heat up quickly, are pretty powerful, and don't use a lot of fuel.
They have their downsides, though. You need to carry fuel with you. While I carry mine in the fuel carriers designed for backpackers, it can sometimes be disconcerting knowing this fuel is kept in my car.
Even though they are thrifty with the fuel, when it runs out, the stove is useless. I needed to fix that. I needed a field-expedient stove that used wood as the primary fuel.
Of course, there's the campfire. Very easy to make, but not very efficient for cooking. By their very design, they throw off lots of heat.
I've made Dakota firepits. They work wonderfully, and are very efficient. But, like campfires, they're not portable. You use it where you build it.
It seems like I kept being brought back to coffee can-based stoves. It looked like the most efficient design was the Rocket Stove.
So I built one to test it out.
A Rocket Stove has a number of features. There is the large outer shell, an inner "L" shaped chimney and fuel feed ramp, and a shelf on the feed ramp to provide lots of air in the combustion chamber/chimney to provide a high level of efficiency.
Here are the basics (click to enlarge):

The cool thing about rocket stoves is they can be made out of all kinds of materials, from bricks and clay for use inside of a home, to coffee can-sized for use while camping. It's the design that's important.
The first time I heard of a Rocket Stove was a year and a half ago over at the Dragon's place. He made a very nice one that is super efficient.
I wanted to make one that could be thrown together out in the field with discarded cans, items I keep in my GHB and things scrounged in the wild. My backyard would be considered "the wild" for this little test (and NO, I wouldn't allow myself to "find" my power tools in the backyard!).
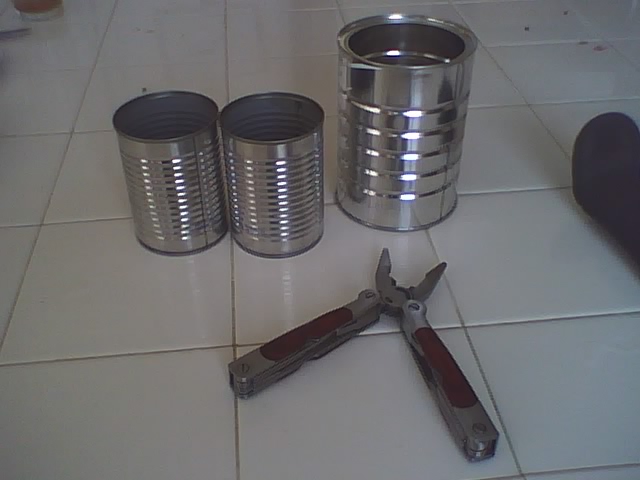
That's two dog food cans, a larger coffee can and a multi-tool. The two dog food cans would make up the "L" and the coffee can would be the body.
Using the can opener on the multi-tool, I removed the bottom of one of the cans. This would act as the fuel feed hole. I lined it up at a 90 degree angle with the other dog food can to determine where I'd need to cut a hole in its side to complete the "L".

I marked it out (yes, with a Sharpie I keep in my GHB!) and made pie cuts with the point of the knife in the multi-tool (it cut through the can like butter).

Note: When making these cuts, make one center-to-edge of circle cut first. THEN make your other cuts from the outside of the circle towards the center. Your cuts are much more accurate. On the smaller can, while opening up the hole a bit, I was making one of the cuts on the upper part of the circle, and the knife ran on me, cutting the can to the very top of the lip. The reinforced banding on the lip was the only thing that kept me from slicing open the whole can.
After A LOT of tweaking, I got the cans together. I then lined up one of the dog food cans on the coffee can, marked it out and made similar cuts and slapped everything together.
Front view:

Top view:

You'll notice all of the "mess" in the top view from the folded edges of the can holes. I just pushed these flat with the pliers of the multi-tool to clean things up.
I had nothing for the ramp that is used to create the air channel in the feed tube. DING! I keep tins of sardines and kippered snacks in my GHB. The kippered snacks come in a long slender tin. The lid would work PERFECTLY!
I opened the tin of kippered snacks (I love these things!) and fashioned the fuel ramp. I basically measured it to length, and folded it so it was the same length as the can. I then folded down the sides of the lid to provide the stand-off to allow airflow. It sat in the can perfectly.

You need to add some sort of insulation between the outer walls of the chimney and the inner walls of the coffee can. It helps to make the stove more efficient. I poured some sand and dirt from my backyard into this void. Some of it started escaping from the bottom of the hole in the coffee can. I grabbed some aluminum foil from the fishing kit in my GHB and stuffed it into the voids. It kept out SOME of the sand/soil, but not all of it. I only filled the void up perhaps half way.
The last thing I did was punch 8, 1/2 inch air holes about a half inch below the rim of the coffee can. Since I intended on using the top of the can as my pot stand, I needed to provide a way to keep the air draft alive.
Now to see if this puppy works!
I scrounged up a piece of a stake made from oak to use as my fuel. I used my Kabar survival knife to split the pieces into usable sizes. I also grabbed an ashtray to start my fire, as it was windy and I didn't want to have my kindling blowing all over my backyard and catching stuff on fire. Here's what I started with:

Starting at top center of the picture moving clockwise: The rocket stove, 1qt camp pot, ash tray with 1 Vaseline-soaked cotton ball and two pieces of kindling with feathered edges, a fire sparker, the multi-tool, a nesting fork-spoon-knife kit, the lid to the pot and three bundles of differently sized oak stake pieces. Please note that this is ALL the fuel I was allowing myself.
You'll also note - right above the pot lid, a bag of light brown stuff. That is one of my Just Add Water (JAW) meals.
My test would be to bring 2 cups of water to a boil and to make myself some soup. Might as well be practical here!
I got the cotton ball flaming with a single strike of the sparker (these cotton balls RULE!) and threw in the two feathered pieces of kindling. They were then put into the feed ramp of the stove.
It was cranking out flame virtually immediately!

I threw the pot on top, and started my clock to see how long it would take to bring the water to a boil and cook my meal.

The flame promptly went out. I removed the pot, and it started right up again. Apparently, the air holes I punched into the coffee can were inadequate for the job. I found that I needed a very aggressive fire to keep it alive with the pot on the stove.
It took approximately 10 minutes to get bubbles to form at the bottom of the pan. I was never able to get a full boil going. I dumped the JAW soup mix in the pan, gave it a stir and covered it up.
I alternated between pushing more sticks into the fire chamber, removing the pot to get the fire going again, and stirring the soup. All told, it took another 10 minutes (for a total of 20 minutes) to cook the soup.
Very impressively, those little bundles of wood shown in the picture above were all I used. In a camp fire or even a Dakota fire pit, that would have been gone in a minute. I had perhaps a 1/4 cup of ash after the fire.

So, what did I learn?
Pro: Very sturdy. Very Cheap. Very fuel efficient. Portable.
Con: Dirty. Even though it was very efficient, there was a ton of soot on the bottom of the pot. No more than you'd have with a campfire, but with its touted high efficiency, I expected less.
Other than that, it was pretty damned impressive. My design didn't allow for enough air to reach the fire chamber with the pot on the top. That's not a problem with the Rocket Stove, it was a problem with how I put it together.
Along a similar line, the coffee can diameter should match the diameter of your pot, if at all possible. This will allow more of the flame coming up from the chimney to "lick" the bottom of the pot and give you quicker desired temperatures.
----------
I'd guess it took me about a half hour to make the stove. I went slowly so I wouldn't cut myself on any of the exposed edges.
It was a good exercise. I will probably put one together that is more like the one Dragon made - more precise, sturdy and larger. It could be brought along when car camping or similar situation or used at home during an emergency when you didn't have access to utility-provided fuels, electricity or other stored fuels.
---
Accept The Challenge
What options do you have to cook your food (or make water safe to drink)? If you must "bug out" can you prepare a fire only using the tools you have in nature or in a Bug Out Bag/Get Home Bag?
Remember PACE - Primary, Alternate, Contingency, Emergency. Give yourself options. For example, to make fire, have a disposable lighter, water-proof matches, a fire steel and a magnifying glass.
Practice making a fire with each - don't assume you know what you're doing!
If you want to go "hard core," teach yourself how to make fire through friction - either a fire bow drill or fire plough. I have tried both, and have yet to be able to make a fire. More reading, more practice.
Fire keeps you alive. Don't leave home without it!
---
Please click our advertiser links. They pay us so you don't have to. A click a day is all we ask!
Copyright 2010 Bison Risk Management Associates. All rights reserved. You are encouraged to repost this information so long as it is credited to Bison Risk Management Associates. www.BisonRMA.com
7 comments:
Fun experiment. I was daydreaming just yesterday about how we could build a rocketstove. Most of the rocketstove manufacturers are based on the west coast and the shipping to Ohio is InSaNe.
As a disadvantaged individual ;), I'm really sorry I missed the convo a couple days ago about recognizing one's oppressor. Looks like it was a good time!
Also, can you give me any ideas what I can expect at a concealed carry class? I'm signed up for one on Aug 27 and I'm a little nervous! Talk about stepping out of your comfort zone.
Andrea, there are a lot of online instructions for making great Rocket Stoves. Ones that are very well constructed.
Building one is somewhere on my To Do list...
Regarding CCW: Your state DOJ or some similar site should have information on what's needed to pass their requirements.
When I got my Utah non-resident CCW, we spent 4 or 5 hours in class going over the laws on when you can and cannot draw and/or use your gun. Obviously, self-defense only. Brandishing will get YOU in trouble.
You'll likely need to demonstrate proficiency as well. We had to fire at a target at varying distances with some percentage of hits in the center mass zone.
After you pass, you'll want to think about how you'll carry the gun as well.
When you're out in public, they make a number of great concealment purses. Check here for some ideas -
http://magills.com/index/42_Concealment+Purses/
When I'm in a Free State and carrying, I use an Inside The Waistband holster made of Kydex or Polycarbonate. These keep their shape better than thick leather holsters, allowing you to re-holster one-handed.
I also use these t-shirt holsters when a belt holster won't work.
http://magills.com/index/40_Concealment+Clothing/
One caution with the t-shirt deals: It must be a small, light gun. I've got a small .38 special, 5-shot revolver that I use for this application.
Good luck!
Thanks for the links...I'll check those out.
The Mr. got me a Walther P-22 for an early anniversary present and I'm fairly proficient using it. I'm just afraid the instructor will ask me a brain-dead easy question like "where does the magazine go?" and I'll go blank LOL.
As far as carrying, my best options would probably be one of those wowwy-zowwy purses with the steel-reinforced shoulder straps...or one of the ankle holsters. I think one of the ankle holsters under any of my bootleg jeans would be the ticket.
Andrea, you'll do great. If you get stumped at any point, just take a breath and relax!
Holsters: I'm not a big fan of ankle holsters other than for a back-up gun. They are generally more difficult to access than other options.
If you don't go with a purse option, think about the Inside The Waistband option. You can wear a shirt that has a tail, and the gun will never be seen.
You've also got to consider spare ammo. Where will you keep your spare magazines?
This is especially important with a .22. A big man or anyone with a big winter coat may not even be slowed down.
Work a lot on your rapid fire shooting skills. The .22's are great for this, as there is very little recoil.
One of the keys to self defense is to fire until the threat has stopped. No more, no less. Generally speaking, it's going to take a lot of .22's to do that.
Give 'em hell!
I recently bought the fire-steel army model and I think it's a must have in any survivor-kit.
Anon, yeah, I actually prefer the fire steels to the magnesium shavings deal. I never seem to shave off enough! In most of my bags and kits, I have both.
Pretty nice post. I just stumbled upon your blog and
wished to mention that I have really loved surfing around your blog posts.
After all I will be subscribing for your feed and I am hoping
you write again soon!
Post a Comment