Showing posts with label Emergency Preps - Gear. Show all posts
Showing posts with label Emergency Preps - Gear. Show all posts
Friday, November 20, 2015
Gun Control Song
---
Share this post! Click the Twitter, Facebook or Google+ icon below, and let your friends know!
Copyright 2015 Bison Risk Management Associates. All rights reserved. Please note that in addition to owning Bison Risk Management, Chief Instructor is also a partner in a precious metals business. You are encouraged to repost this information so long as it is credited to Bison Risk Management Associates. www.BisonRMA.com


Friday, May 30, 2014
Starter List: Essential Items To Keep In Your Car

Spare Tire and Related Tools
Keeping a spare tire in your trunk is absolutely essential. Make sure that you’re checking it periodically to make sure that it’s in good, working condition. If you don’t know how to change a tire, now is the perfect time to learn. Here’s a handy resource to get you started. A tire jack and lug (or spider) wrench will complete your kit, allowing you to change your own spare, if the occasion should arise.
Emergency Kit
Start with an Auto Emergency Kit such as this one from Interamer and work your way outward, expanding it with other ICE (In Case of Emergency) items. This kit includes emergency blankets and ponchos, along with a first aid kit. A great feature of this kit is the fact that it comes with jumper cables, an absolute necessity for any car.
Additional items you might want to consider keeping in a more easily accessible place, like your glove compartment would include a glass and seatbelt cutter, both of which would be useless if tucked away in your trunk. A smaller first aid kit with the basics and a second flashlight might be good to keep on hand up front too.
Phone Charger
Smart Phone batteries are notorious for their short life spans, so having a spare battery source readily available is always a good idea. Chargers that connect and charge through the lighter will do in a pinch, but a better one to have would be something like this one by Juicebar, via Tiger Direct. Holding a charge for up to 30 days, this charger charges by USB port, giving your phone a full-battery’s worth of juice. Set a reminder to check on this charger about once a month to ensure that you’re not caught with a non-functioning spare battery when an emergency hits.
Weather Related Tools
The aforementioned Auto Emergency Kit contains a three-day food bar, which would come in very handy should you get stranded. Depending on your location, some seasonal materials are necessities in your trunk. For areas hit particularly hard by snow, sleet and hail in the winter months, make sure that snow brushes, ice scrapers and shovels are in the trunk from about mid-October to mid-May. Sand and/or tire chains are also very useful in the winter months.
Useful in all seasons, but especially in areas hit by excessive heat and humidity, would be bottles of water. Bottled water does have an expiration date, so if they’ve been rolling around in your trunk for 12+ months, it’s time to replace them. 5-Year Shelf Life purified waters like Aqua Blox might be your better bet here, though another option would be a bottle of germicidal tablets to clean suspicious water. Ponchos, plastic bags and umbrellas come in handy year-round, but especially in the rainy months.
The Extras
These are likely items that are already in your car in some capacity, but they bear reminding: extra tissues, baby wipes, feminine hygiene products, pens and a pad of paper are all useful items that should be at arm’s reach in your car.
For some this may seem like an excessive number of things to keep in your car, but you’ll be happy to have them in a pinch. For those who feel like we missed out on something essential, be sure to let us know in the comments what else you’ve included in your car’s emergency kit.
---
Share this post! Click the Twitter, Facebook or Google+ icon below, and let your friends know!
Copyright 2014 Bison Risk Management Associates. All rights reserved. Please note that in addition to owning Bison Risk Management, Chief Instructor is also a partner in a precious metals business. You are encouraged to repost this information so long as it is credited to Bison Risk Management Associates. www.BisonRMA.com
Tuesday, April 22, 2014
Defensive Weapons Practice

Whenever possible, you want to train as realistically as the situations in which you may find yourself.
Let's look at some of the different defensive tools, and what options we have.
Stun Guns. Very difficult to train with. Who wants to stand in as your "dummy" and get shocked? The nice thing with stun guns is that accuracy is not an issue. They work as long as the probes come in contact with any part of the assailant's body.
With these, you can do a periodic operating review of how the stun gun works. Where is the safety switch? Where is the trigger? How do you change the batteries? Are the batteries fresh?
Tasers. Easy to train with, but a bit pricey. Taser cartridges will cost you about $25 a piece, and that will give you a single shot. Still, it's your safety we're talking about. On at least a quarterly basis, you should test fire your Taser.
You can practice in your backyard, firing at a cushion suspended from a tree limb. The consumer version of the Taser fires 15 feet, so be sure you are within that range before firing. This practice will help you to be able to judge that distance (it would be horrifying to fire the Taser when the assailant was 20 feet away) and practice accuracy.
Pepper Spray/Tear Gas. Training with both of these is identical, and quite easy. We recommend that you set up a stake or use a tree and staple a paper plate at least 5 feet off the ground. Pace off 10 or 15 feet - whatever distance you specific brand of spray indicates it will reach - and test it. Start your aim approximately 6 inches above the plate and proceed in an "S" formation down to the bottom of the paper plate. It should be a 1 or 2 second burst.
Re-do this test until the spray canister is empty. This gives you plenty of practice, and also lets you know how many shots are REALLY in your canister. At $10 or $15 per canister, this is very inexpensive practice.
The key is to make sure that where ever you set up your training area, you ensure the wind is to your back. You don't want to inadvertently spray yourself during training! Also, don't touch your eyes or mouth until you've washed your hands with detergent soap.
Firearms. Far and away, the easiest defensive tools to train with because there are facilities specifically designed for their usage - shooting ranges. We recommend that you use an indoor range whenever possible. Since you are most likely to be using a firearm in your home, the sound characteristics of an indoor range much more closely reflect those of your home (when compared to an outdoor range).
Guns ARE loud, and becoming familiar with the report (the bang) of the gun is important when performing under pressure. Indoor ranges are also more flexible, in that the targets can be easily set at different distances - typically from 5 to 20+ yards - with the flip of a switch. And being indoors, you can train year around.
A box of 50 cartridges will cost anywhere between $10 and $40 depending upon the caliber. Range fees will typically cost you around $10 per hour.
Proper initial training and ongoing practice in any endeavor are the keys to success. You personal safety is no exception.
Safety Tip: Regardless of what you're training with, assume some sort of mishap will occur. For instance, the wind might change directions while you are testing your pepper spray. Be sure you have clear, fresh water close at hand to allow you to immediately wash out your eyes in the event of a problem.
Whenever I go to the shooting range, I ALWAYS have a number of QuikClot sponges to stop blood flow in the event of an accident.
Think through what might go wrong, and plan accordingly.
---
Share this post! Click the Twitter, Facebook or Google+ icon below, and let your friends know!
Copyright 2014 Bison Risk Management Associates. All rights reserved. Please note that in addition to owning Bison Risk Management, Chief Instructor is also a partner in a precious metals business. You are encouraged to repost this information so long as it is credited to Bison Risk Management Associates. www.BisonRMA.com
Saturday, March 29, 2014
Emergency Shelters

>>You can live three minutes without air
>>You can live three hours without shelter
>>You can live three days without water
>>You can live three weeks without food
How many people put a lot of thought into the second item - the one about shelter? People may think about it, but few acquire the skills and equipment necessary to git 'er done.
What elements should a shelter possess? The only "must have" requirement is that it protects you from the weather. Many shelters also provide you with security from predators, but unless your camp is in the middle of a pack of wolves, your focus should generally be on protection from the weather.
Also, when thinking about types of shelters, don't think it only means a structure. A poncho or garbage bag are shelters as well. My BOB/GHB contains a number of large, heavy duty garbage bags, Mylar "emergency" blankets and light-duty tarps. And LOTS of paracord. These are all small, light and don't take up much space, but will at least give me some short-term shelter in an emergency situation.
There are a couple of scenarios for which we're making shelters. The first are shelters that are designed to protect you from cold and wet. Hypothermia occurs when your body temperature drops below 95F. If you become wet and the weather is cold, your chances of survival drop significantly.
In these types of environments, we want shelters that keep us dry and provide for the retention of our body heat or external heat sources to keep us warm.
Trash bag poncho
10 things to know about building a natural shelter
Wilderness shelters
Emergency tarp shelter (video)
The second type of shelter are those designed to protect you from the heat. Hyperthermia is the over-heating of your body, generally to temperatures between 100F to 104F. You get so hot, your body's natural ability to cool itself fails.
So, we want to shield ourselves from the heat. Since we all know that heat rises, this logically means that we want to stay low, as well as out of direct sunlight.
Shelter in the desert
One of the key things to note is that whenever possible, the part of the structure facing the sun will be more effective if it's insulated. And remember, air is a good insulator.
So, if you've got a single tarp that is acting as a sun break, you'll see a 15F to 20F drop in temperature. Set up two tarps - one over the other with an air space between them, and you can easily double the temperature drop.
 |
| Click To Enlarge |
Lastly, know how to tie knots. Check out this post ("All Tied Up In Knots") which also contains a link to an earlier post ("Knotty Problems").
---
Share this post! Click the Twitter, Facebook or Google+ icon below, and let your friends know!
Copyright 2014 Bison Risk Management Associates. All rights reserved. Please note that in addition to owning Bison Risk Management, Chief Instructor is also a partner in a precious metals business. You are encouraged to repost this information so long as it is credited to Bison Risk Management Associates. www.BisonRMA.com
Monday, February 24, 2014
From Fowl To Flame
Or, How to make a field expedient candle from chicken scraps-n-stuff...
I eat a lot of chicken. Lots.
Lately, I've been buying packs of thighs from the store to marinade, then roast or smoke. To keep a check on my girlish figure, I take off all of the skin, and cut off the obvious chunks of fat.
Each time I do this, I've got a hell of a pile of stuff that hits the trash bin. Seemed like a waste. So, I decided to do some research on how to render fat. I figure you can always use another skill, and with the price of oils in the store, I could save a couple of bucks in the bargain.
I had an ulterior motive, too. I wanted to see if I could make a candle from the fat. I've made emergency candles from blocks of paraffin and Altoids cans, so I figured using rendered fat would work as well.
After cleaning up my thighs, I was left with this mound of skin, meat and fat -

From just under 5 pounds of chicken, I had a hair under 1 pound of stuff to work with. Yeah, 20% of what I was paying for was hitting the garbage.
Following a mish-mash of instructions I found online, I chopped the skin into smaller pieces - say around 2 inches square. I put them into a pan, and added a half cup of water. The heat was turned to medium, and away we go!

That's what it looked like after about 5 minutes or so. The water supposedly keeps the skin and meat from burning. It worked, and I never got any pops from the oil.
I let it go another 15 minutes or so, stirring it often. You want to have no white skin when you're done. This picture is a couple of minutes before they came off. Notice how the skins have browned up, but there are still a couple of pale pieces in the mix.

A couple of minutes later, I broke out the fine mesh strainer, and ended up with this -

Yep, 225 ml of oil (that's 7.6 fluid ounces, or just under a cup, for you non-metrics out there).
Oh, and there was a bonus, as well -

Yeah, baby! Cracklin's! While still hot, I sprinkled them with some garlic salt. Tasted just like garlic pork rinds. Seriously good. And surprisingly low-cal.
OK, back to task. You need to make sure there aren't any bits of meat or skin that made it through the screen. I added water to the oil to get the oil to float, and all of the heavier pieces to drop to the bottom.
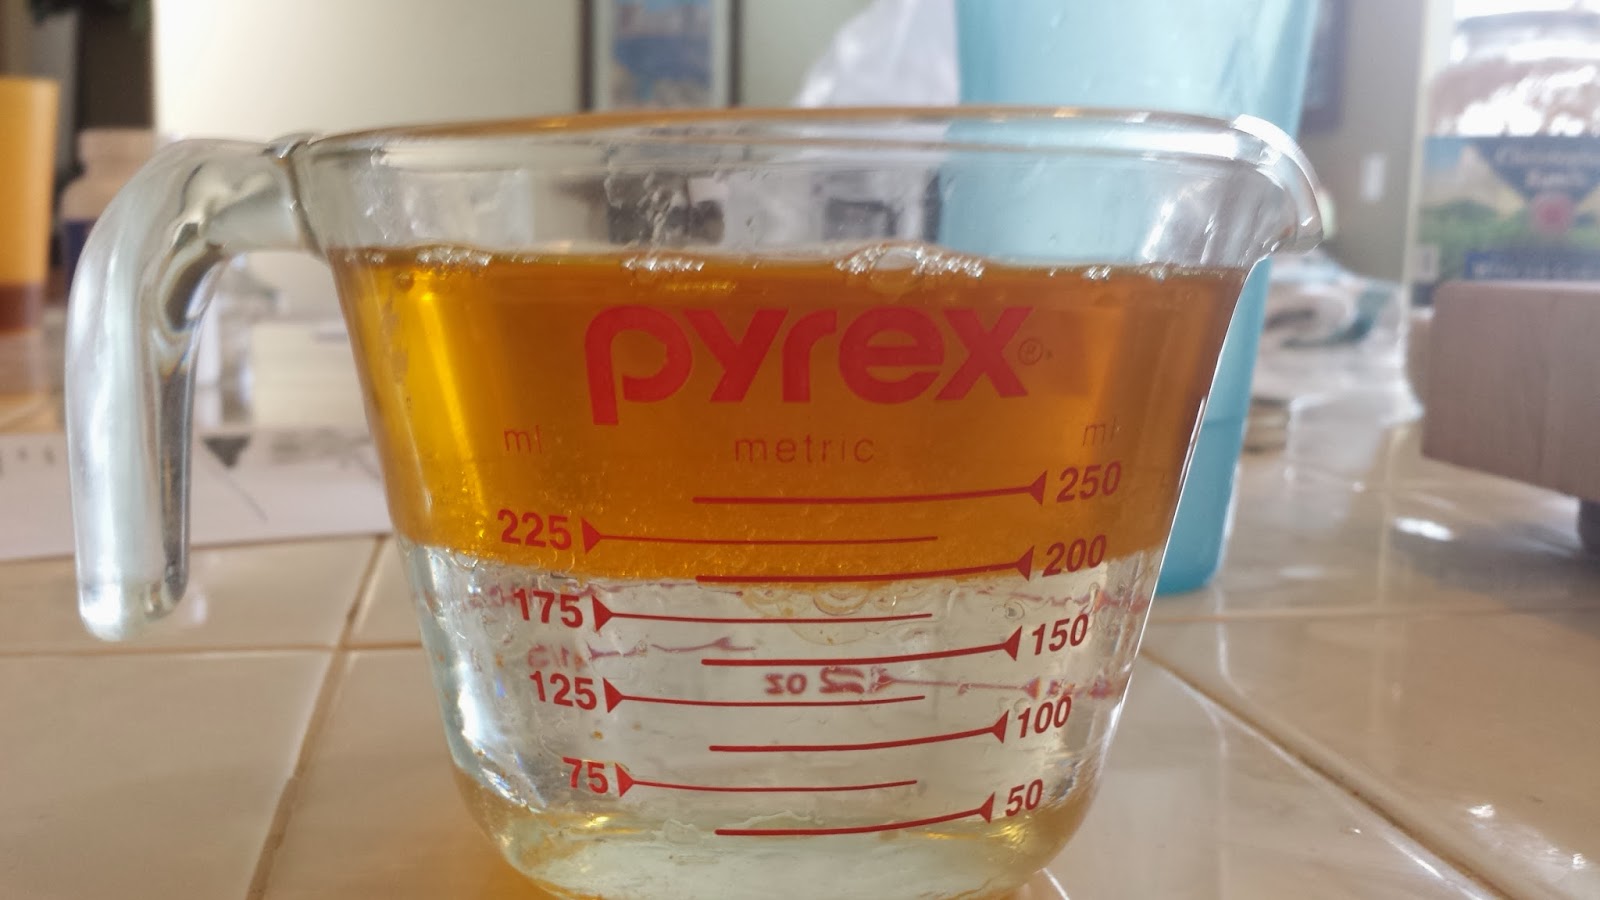
I put this in the fridge to chill down for a few hours. Once is set up, I poked a hole in the top of the solidified fat right near the spout of the measuring cup. Poured off the water, and scooped the fat into a bowl -

At this point, this is called, schmaltz. It's used in Jewish cooking as everything from cooking oil, to a spread on toast. It only had a faint smell of chicken. It is VERY soft, even when fully chilled. Kind of like soft butter. If you touch it, it starts to melt.
On to our candle. I assembled my tools -

Those would be: The fat, an empty soda can, a length of cooking twine, a bamboo skewer and poultry shears.
I placed the fat in a pan to re-liquefy, and set it on the stove on the very lowest heat. While that was working, I needed to make a candle holder. That would be done with the empty soda can.
In the videos I watched on lard candles, the fat liquefies quickly. It doesn't have the structural integrity that a candle made of wax possesses. I was going to use a half-pint mason jar, but decided I didn't want to have to clean it up if I had a failure.
Using the poultry shears, I cut the top off the can higher than the final height -

Not wanting to slice an artery on the rim, I cut down from the top - making a series of tabs -

No, I didn't measure them for exact separation distance, or depth of cut. Each cut was about an inch deep. I then folded over the tabs to give me a child-safe lip -

I then tied one end of the twine to the skewer, hung it in the can, then cut the other end so it just touched the bottom. Filled it up with the now-liquefied fat, and put it into the fridge to set up.

Here's our bad-boy in action -

No in-your-face chicken smell while it burns. I'm likin' it.
I'll be interested in seeing how the wick works out as it gets closer to the bottom. As I noted before, this stuff is VERY soft, and I wonder if the wick will tip over. I'll try and post an addendum at a later date.
UPDATE BELOW
---
OK, for those of you that are thinking, "That fat would be much better used in cooking," - well, you might be right. Or not. It might be dark sometime, and you'd be thinking, "Wow, I'm sure glad Chief Instructor showed me how to light up this room with chicken fat..."
Hey, it could happen.
I did some checking, and schmaltz has cooking properties very similar to extra virgin olive oil.
Smoke points (in degrees Fahrenheit)-
Go forth, and render!
---
UPDATE 2/26/14: As a candle, this is a BIG fail. After about two hours burning, the entire "candle" was liquefied and the wick slumped into the fat. No bueno.
On the positive side, the fat is awesome for cooking. I pan fried some pork chops, and did an Asian stir-fry that turned out great. I just keep the bowl of schmaltz in the fridge, and take it out when cooking. Very good stuff that is easy to make.
Also, I like the re-use of the cans. I'd originally mentioned the paraffin candles I've made in the past. This weekend, I bartered for about 20 pounds of paraffin, and I'm going to make some emergency candles in the soda can holders.
Bottom line: Render the fat from stuff that was going to hit the garbage to save a couple of bucks, but eat the fat, don't try and make candles!
---
Share this post! Click the Twitter, Facebook or Google+ icon below, and let your friends know!
Copyright 2014 Bison Risk Management Associates. All rights reserved. Please note that in addition to owning Bison Risk Management, Chief Instructor is also a partner in a precious metals business. You are encouraged to repost this information so long as it is credited to Bison Risk Management Associates. www.BisonRMA.com
I eat a lot of chicken. Lots.
Lately, I've been buying packs of thighs from the store to marinade, then roast or smoke. To keep a check on my girlish figure, I take off all of the skin, and cut off the obvious chunks of fat.
Each time I do this, I've got a hell of a pile of stuff that hits the trash bin. Seemed like a waste. So, I decided to do some research on how to render fat. I figure you can always use another skill, and with the price of oils in the store, I could save a couple of bucks in the bargain.
I had an ulterior motive, too. I wanted to see if I could make a candle from the fat. I've made emergency candles from blocks of paraffin and Altoids cans, so I figured using rendered fat would work as well.
After cleaning up my thighs, I was left with this mound of skin, meat and fat -
From just under 5 pounds of chicken, I had a hair under 1 pound of stuff to work with. Yeah, 20% of what I was paying for was hitting the garbage.
Following a mish-mash of instructions I found online, I chopped the skin into smaller pieces - say around 2 inches square. I put them into a pan, and added a half cup of water. The heat was turned to medium, and away we go!
That's what it looked like after about 5 minutes or so. The water supposedly keeps the skin and meat from burning. It worked, and I never got any pops from the oil.
I let it go another 15 minutes or so, stirring it often. You want to have no white skin when you're done. This picture is a couple of minutes before they came off. Notice how the skins have browned up, but there are still a couple of pale pieces in the mix.
A couple of minutes later, I broke out the fine mesh strainer, and ended up with this -
Yep, 225 ml of oil (that's 7.6 fluid ounces, or just under a cup, for you non-metrics out there).
Oh, and there was a bonus, as well -
Yeah, baby! Cracklin's! While still hot, I sprinkled them with some garlic salt. Tasted just like garlic pork rinds. Seriously good. And surprisingly low-cal.
OK, back to task. You need to make sure there aren't any bits of meat or skin that made it through the screen. I added water to the oil to get the oil to float, and all of the heavier pieces to drop to the bottom.
I put this in the fridge to chill down for a few hours. Once is set up, I poked a hole in the top of the solidified fat right near the spout of the measuring cup. Poured off the water, and scooped the fat into a bowl -
At this point, this is called, schmaltz. It's used in Jewish cooking as everything from cooking oil, to a spread on toast. It only had a faint smell of chicken. It is VERY soft, even when fully chilled. Kind of like soft butter. If you touch it, it starts to melt.
On to our candle. I assembled my tools -
Those would be: The fat, an empty soda can, a length of cooking twine, a bamboo skewer and poultry shears.
I placed the fat in a pan to re-liquefy, and set it on the stove on the very lowest heat. While that was working, I needed to make a candle holder. That would be done with the empty soda can.
In the videos I watched on lard candles, the fat liquefies quickly. It doesn't have the structural integrity that a candle made of wax possesses. I was going to use a half-pint mason jar, but decided I didn't want to have to clean it up if I had a failure.
Using the poultry shears, I cut the top off the can higher than the final height -
Not wanting to slice an artery on the rim, I cut down from the top - making a series of tabs -
No, I didn't measure them for exact separation distance, or depth of cut. Each cut was about an inch deep. I then folded over the tabs to give me a child-safe lip -
I then tied one end of the twine to the skewer, hung it in the can, then cut the other end so it just touched the bottom. Filled it up with the now-liquefied fat, and put it into the fridge to set up.
Here's our bad-boy in action -
No in-your-face chicken smell while it burns. I'm likin' it.
I'll be interested in seeing how the wick works out as it gets closer to the bottom. As I noted before, this stuff is VERY soft, and I wonder if the wick will tip over. I'll try and post an addendum at a later date.
UPDATE BELOW
---
OK, for those of you that are thinking, "That fat would be much better used in cooking," - well, you might be right. Or not. It might be dark sometime, and you'd be thinking, "Wow, I'm sure glad Chief Instructor showed me how to light up this room with chicken fat..."
Hey, it could happen.
I did some checking, and schmaltz has cooking properties very similar to extra virgin olive oil.
Smoke points (in degrees Fahrenheit)-
- Schmaltz - 375
- Butter - 300-325
- Tallow (beef fat) - 400
- Lard (pork fat) - 370
- Veggie shortening (Crisco) - 360
- Extra virgin olive oil - 375
- Virgin olive oil - 420
- Corn oil - 450
Go forth, and render!
---
UPDATE 2/26/14: As a candle, this is a BIG fail. After about two hours burning, the entire "candle" was liquefied and the wick slumped into the fat. No bueno.
On the positive side, the fat is awesome for cooking. I pan fried some pork chops, and did an Asian stir-fry that turned out great. I just keep the bowl of schmaltz in the fridge, and take it out when cooking. Very good stuff that is easy to make.
Also, I like the re-use of the cans. I'd originally mentioned the paraffin candles I've made in the past. This weekend, I bartered for about 20 pounds of paraffin, and I'm going to make some emergency candles in the soda can holders.
Bottom line: Render the fat from stuff that was going to hit the garbage to save a couple of bucks, but eat the fat, don't try and make candles!
---
Share this post! Click the Twitter, Facebook or Google+ icon below, and let your friends know!
Copyright 2014 Bison Risk Management Associates. All rights reserved. Please note that in addition to owning Bison Risk Management, Chief Instructor is also a partner in a precious metals business. You are encouraged to repost this information so long as it is credited to Bison Risk Management Associates. www.BisonRMA.com
Tuesday, February 11, 2014
Tuesday Trash Talk - Playground Politics

This school in Chicago is upset about guns. Well, not guns, but legally required pictures of guns -
Some school officials aren’t happy about the stickers because they contain a very basic image of a gun.No, you mouth-breathing idiot, the general public will be alarmed to find you in charge of a high school, let alone that you had the mental capacity to graduate from high school yourself..
“It is bothersome to have to post a sticker of a gun that says, ‘Hey, folks, leave your guns at home,’” Theresa Nolan, principal of Tinley Park High School, told the SouthtownStar.
Nolan stressed that she is very concerned with “safety and security” and concerned that, somehow, someone could wrongly interpret an image of a gun emblazoned with the universal sign for prohibiting something.
“I think the general public will be alarmed by it and wonder if people have been allowed to bring guns to school in the past,” Nolan also fretted.
Perhaps her high school students can write a paper on the magical, invisible force field that protects them once they step into the Gun Free Zone.
Click your ruby slippered heels together, Theresa, keep them clicking...
---
Perhaps THE BEST article I've seen on helping teachers that are trapped in a Gun Free Zone have a chance of saving their lives and the lives of their students. I was so impressed, I sent a copy of it to my wife, who is a 5th grade teacher. She shared it with the teachers at her school.
Everything begins at the door. The door is a chokepoint. That narrow gap which decreases an aggressor's ability to attack, while increasing your odds for a successful defense. Everything depends upon what does or does not happen here. Therefore THE primary concern is to prevent an active shooter from gaining entry to the room. Locking a door is a problem if the door doesn't have locks. Reasoning as to why they don't is not the objective here. Creating a solution is.This article is full of simple, inexpensive and most importantly, effective ways to keep the bad guys at bay while the good guys are on the way.
I predict a run on gallon jugs of cooking oil and 30 pound bags of kitty litter. The 15 inch wrench - for classroom repairs, of course - has already been purchased, along with a homemade paracord wrist strap. Don't want that baby slipping out of your hand while you're
 |
| To Serve and Protect |

It seems that a local all-girls Catholic school was going to help celebrate Black History Month by having a lunch which celebrates blacks in the school. You know, like when it's Hispanic Month, you might serve tacos or burritos or tamales. Filipino Month might have pansit and lumpia. You get it.
Well, for Black History month, they decided to serve fried chicken, collard greens, cornbread and watermelon.
Apparently, this was uber Politically Incorrect -
The principal and dean of the school refused to talk to NBC Bay Area on Wednesday, but school officials held an assembly on campus to discuss the issue and sent an apology letter to parents.Seriously? There are now Politically Incorrect fruits and vegetables? What the hell is wrong with these principals?
"I'd like to apologize for the announcement and any hurt this caused students, parents or community members," Principal Nancy Libby said in the letter. "Please know that at no time at Carondelet do we wish to perpetrate racial stereotypes."
As most of the commentors noted, what the hell SHOULD have been served? And if the principal was so concerned about offending blacks and "racial stereotypes", why didn't she profusely apologize to the students and parents that were offended by the tacos, burritos and lumpia?
BECAUSE THEY WEREN'T OFFENDED!
This "boy who cried wolf" (oops, can I say 'boy' when discussing blacks?) crap is doing nothing more than desensitizing the public when a legitimate complaint is aired.
The Reverend Al should be proud of his work here.
---
When I attended school, if you got out of line, you were put on detention. Do it again, and you got a suspension. In both cases, your parents got a call, and there would be hell to pay once you got home.
Nowadays, the process is much more lenient - students can, "push the envelope" much further, but when they do, the detention and suspensions still happen. On top of that, because of this lenient culture, some students go WAY too far, and the criminal justice system gets involved.
Well, apparently, too many minorities are getting violent in school and ending up in jail. That's just not acceptable -
Winning praise from civil rights advocates, the U.S. Department of Education released new federal guidelines Wednesday aimed at stopping an explosion in student suspensions, expulsions and referrals to the criminal-justice system.Yeah. The rules are only applied to the poor and minorities. And it's the "overly punitive discipline" that's at fault, not the actions of said poor and minorities.
The ideas are a response to mounting concerns that overly punitive discipline is pushing too many low-income and minority students out of schools and toward failure rather than helping them engage academically. The Department of Education and the Department of Justice teamed up in a two-year effort to develop lists of resources and principles that educators have found effective at keeping campuses orderly without resorting to kicking out kids.
The proponents of these changes say that minorities are treated more harshly than whites for the same offense. OK, prove it. And if you do, sue the hell out of the school and the administrator that enforced the punishment.
Instead, they want to cherry-pick some instances of disparate treatment, and point to them as the norm. That's a steaming pile of crap.
I can tell you that, from my personal experience, it is usually the other way around. Minorities are given much more leeway. If they're punished, the school administrators come down on the teachers because so many of the classroom disrupters are black (usually) and, "it doesn't look good."
This was one of the primary reasons we sent our boys to a private school during their elementary and middle school years. The two schools they would have attended were out of control. If we wanted them to get an education, we could either move or pay for private school. We couldn't afford to move, and could barely afford the tuition, but we made due.
For high school, it was a similar situation, and in that instance, we moved to a district with a good reputation. My wife and I have already agreed that when/if our sons have children, we will help them to be home schooled, or at worse, attend a private school. Public schools are a joke.
I'm sure the schools will be much better once the classroom disrupters are allowed to stay in the class regardless of their actions. Yeah, that'll work out just fine...
---
Share this post! Click the Twitter, Facebook or Google+ icon below, and let your friends know!
Copyright 2014 Bison Risk Management Associates. All rights reserved. Please note that in addition to owning Bison Risk Management, Chief Instructor is also a partner in a precious metals business. You are encouraged to repost this information so long as it is credited to Bison Risk Management Associates. www.BisonRMA.com
Monday, February 3, 2014
Turn Your Head And Cough

I'm good on the prevention side. I have a sufficient supplies of wet-wipes, hand cleaner, toilet paper, soap, detergent, and other cleansers. In addition, I have a large quantities of iodine sanitizer and acid-based sanitizers. I have these because of my brewing hobby. They are used by any business (or hobbyist) that needs sanitized equipment to keep the "bugs" at a minimum.
Not a bad idea to have a bottle or two in your preps as well....
I'm also pretty good in the wound-dressing department. Sufficient supplies of gloves, bandages, suture kits, tape, saline for wound irrigation, and antibiotic creams.
My weakness is in identifying illnesses that occur despite my best efforts, and more importantly, knowing how to treat them. For them, I've basically got over the counter medications. Cold and flu pills, aspirin, ibuprofen, Benadryl, cortisone cream, Tums, Pepto-Bismol and the like.
I've got a small stash of prescription drugs held-over from past doctor visits, plus some Fish Mox - amoxicillin - for antibiotics. FWIW, I chose amoxicillin, as I know all of my family members are NOT allergic to it, and have not taken it in amounts in the past to render it ineffective. Plus, it's got the longest shelf-life of any of them. Yes, I have the treatment regimen printed and located with the pills.
So, TSHFT, no doctors are available, and someone in my group gets a rash on their torso and has a slight fever, what do I do? How do I diagnose this? Obviously, I don't want to treat one thing in a manner that either wastes resources, or makes the condition worse.
If a wound becomes infected, how is it fixed? How would you practice this ahead of time?
What if you came down with one of these, "10 Diseases That Will Become Farm More Common After The Collapse"? None sound like fun, and most are deadly.
[Note: Their suggestion of a bucket of bleach solution outside a door to dip your hands into is a great idea, and is one that we brewers follow - with the previously mentioned iodine sanitizer. Really keeps the bugs to a minimum.]
What resources are out there to help with the diagnosis and treatment of illness, injury or disease? I'm thinking primarily text-based. I know this crosses over into Medical Doctor territory, but there must be resources out there.
WebMD has a kind of cool tool called, "Symptom Checker" that walks you through a series of questions. It will then give you a list of probabilities, which then how to treat each of the possibilities. It's a great tool, but I want to have something I can hold in my hands, and that doesn't rely on electronics or Internet access.
The only booklets I'm able to find are for mental illnesses. I've got alcohol and hand-cuffs for that ;-)
What do you have in your preps stores?
---
Share this post! Click the Twitter, Facebook or Google+ icon below, and let your friends know!
Copyright 2014 Bison Risk Management Associates. All rights reserved. Please note that in addition to owning Bison Risk Management, Chief Instructor is also a partner in a precious metals business. You are encouraged to repost this information so long as it is credited to Bison Risk Management Associates. www.BisonRMA.com
Tuesday, January 28, 2014
Tuesday Traipses
Hey, still working on the cute logo, but you can now follow us on Twitter - twitter.com/BisonRMA - lots of great stuff on self-defense, money, politics, and the like. Go on.... click it and follow us.... you know you want to.....
---
Need more reason?....
It was just last week that we discussed the reasoning behind keeping all but the bare minimum of your money OUT OF your bank -
Now, we've got HSBC - which in 2012 was the world's largest bank - telling folks they can't withdraw their money unless they've got good reason -
It's also irrelevant.
Let this sink into your brain: If your bank doesn't want to give you your money, they have the power to turn you away. Plain and simple.
What are you going to do when they say, "No"? Stomp your feet and pitch a fit? How do you think THAT will end?
After the Target credit card debacle, we saw Chase Bank limit ATM and debit card withdrawals. You want to spend more than $400? Tough shit! We control the purse strings, not you, you silly little boy!
How much control over your life do you want to willingly give away?
Remember: You don't own it unless you can hold it...
---
Revenge of the killer bees?....
I've got a customer at my PM store that produces and sells honey. Seriously, until you've tasted real, right from the hive, unprocessed honey, you have no idea what you're missing.
I used to be able to buy his end-of-season stock at a great discount by buying a dozen or so half-gallon jars of the stuff. No more. He sells out each year now before season end.
Anyways, he was in the store, and we were talking about fake bullion, and he brought up fake honey.
WTF? Fake honey? Yep. It seems that US markets are flooded with stuff that looks like honey, but really has no honey in it. Who knew?
Apparently, the folks over at Survival Magazine did ("Real or Fake Honey? How to tell the difference.").
Click here for an infographic that gives you steps for authenticating your honey in you own "home laboratory".
---
Draw!
In virtually all of my handgun classes, I get asked about how to choose a holster. For my FIRST Steps Pistol Orientation class, the classroom materials from the NRA includes a booklet on the subject. Pretty good stuff.
Inside The Waistband (IWB) holsters are one of the considerations. This article gives a good overview on how to select one.
Not so much.
Drawing from a concealed holster, be it an IWB, appendix carry, shoulder carry or ankle carry is much different than drawing from an unimpeded, outside the waistband holster. You MUST practice on a regular basis.
This past weekend, I had a private lesson with a woman that is going to Alaska for a few months, where she'll be out in the bush quite a bit. We were working on gun selection, and I asked her about holsters.
She hadn't thought about it at all.
I told her that in my PM store, I practice ten draws every morning I'm in the store. I want to make sure the gun is properly positioned, my clothing doesn't need to be adjusted and that my draw stroke is, "butter smooth."
I figure that if I have to draw, I don't want to be thinking about the mechanics of presenting the gun. I want my brain power focused on the situation and how I'm going to ensure my customers and I aren't harmed by some dirtball.
Like many things in life, certain skills are perishable. Shooting well, and drawing from a holster are just two of them.
---
This should be interesting...
Duck Dynasty is in the House!
I'm guessing it will be the latter.
Gawd, I hope he comes dressed in cammo...
---
Huh? In California?!
How did some common sense sneak its way into California?
Instead, tenure morphed into a Job For Life guarantee. Put in the requisite number of years, and you become a Teflon Teacher - little can be done to remove you regardless of your actions - or inaction.
Try getting that kind of guarantee in the private, non-union sector. The don't exist. Why would you reward someone solely on the basis of their time-in-job?
This attitude is another reason why unions - outside of those in government - continue to decline in membership.
Back in my banking days, I had a number of major unions as customers. Including certain California unions that represented teachers.
These guys play rough. They will throw TONS of dollars at this to get it defeated. If they lose in court, they'll get their buddies in Sacramento to write new laws in their favor.
Same ol', same ol'...
---
Copyright 2014 Bison Risk Management Associates. All rights reserved. Please note that in addition to owning Bison Risk Management, Chief Instructor is also a partner in a precious metals business. You are encouraged to repost this information so long as it is credited to Bison Risk Management Associates. www.BisonRMA.com
---
Need more reason?....
It was just last week that we discussed the reasoning behind keeping all but the bare minimum of your money OUT OF your bank -
So, if you know with metaphysical certitude that the bits and bytes that represent your wealth are at risk and will be violated, why would you keep anything other than the very bare minimum (bills that must be paid with a check or electronically) in a bank?That post's focus (at the bottom of the post) was on the insecurity of electronic banking systems. In it, though, I touched on the confiscation angle - bail-ins - and how they'll just snatch up your money as they please, thank-you-very-much.
Now, we've got HSBC - which in 2012 was the world's largest bank - telling folks they can't withdraw their money unless they've got good reason -
“When we presented them with the withdrawal slip, they declined to give us the money because we could not provide them with a satisfactory explanation for what the money was for,” he said.After the PR ass-kicking they took, HSBC is now saying it was all a big misunderstanding, it was for customer safety, there was poor training, and blah, blah, blah. Maybe that's true.
It's also irrelevant.
Let this sink into your brain: If your bank doesn't want to give you your money, they have the power to turn you away. Plain and simple.
What are you going to do when they say, "No"? Stomp your feet and pitch a fit? How do you think THAT will end?
After the Target credit card debacle, we saw Chase Bank limit ATM and debit card withdrawals. You want to spend more than $400? Tough shit! We control the purse strings, not you, you silly little boy!
How much control over your life do you want to willingly give away?
Remember: You don't own it unless you can hold it...
---
Revenge of the killer bees?....
I've got a customer at my PM store that produces and sells honey. Seriously, until you've tasted real, right from the hive, unprocessed honey, you have no idea what you're missing.
I used to be able to buy his end-of-season stock at a great discount by buying a dozen or so half-gallon jars of the stuff. No more. He sells out each year now before season end.
Anyways, he was in the store, and we were talking about fake bullion, and he brought up fake honey.
WTF? Fake honey? Yep. It seems that US markets are flooded with stuff that looks like honey, but really has no honey in it. Who knew?
Apparently, the folks over at Survival Magazine did ("Real or Fake Honey? How to tell the difference.").
Click here for an infographic that gives you steps for authenticating your honey in you own "home laboratory".
---
Draw!
In virtually all of my handgun classes, I get asked about how to choose a holster. For my FIRST Steps Pistol Orientation class, the classroom materials from the NRA includes a booklet on the subject. Pretty good stuff.
Inside The Waistband (IWB) holsters are one of the considerations. This article gives a good overview on how to select one.
Just as taking the time out to choose the right gun is important, it’s just as important to choose the right IWB holster for your needs. IWB holsters, or inside the waistband holsters, provide users with a quick and easy way of carrying their firearms in a concealed manner in a position that is easy to draw from. There are numerous variables involved in selecting the right holster, but you can find a great IWB holster as long as you follow some key guidelines.Too many people stop after the purchase. What they neglect to do is to practice drawing from the holster. This can give a Concealed Carry holder a false sense of security. Hey, I gotta gun, I'm safe.
Not so much.
Drawing from a concealed holster, be it an IWB, appendix carry, shoulder carry or ankle carry is much different than drawing from an unimpeded, outside the waistband holster. You MUST practice on a regular basis.
This past weekend, I had a private lesson with a woman that is going to Alaska for a few months, where she'll be out in the bush quite a bit. We were working on gun selection, and I asked her about holsters.
She hadn't thought about it at all.
I told her that in my PM store, I practice ten draws every morning I'm in the store. I want to make sure the gun is properly positioned, my clothing doesn't need to be adjusted and that my draw stroke is, "butter smooth."
I figure that if I have to draw, I don't want to be thinking about the mechanics of presenting the gun. I want my brain power focused on the situation and how I'm going to ensure my customers and I aren't harmed by some dirtball.
Like many things in life, certain skills are perishable. Shooting well, and drawing from a holster are just two of them.
---
This should be interesting...
Duck Dynasty is in the House!
Willie Robertson, one of the stars of TV's "Duck Dynasty" and a representative of the family's mainstream Christian values, will be in the House gallery Tuesday night for President Obama's State of the Union address, the guest of Louisiana Rep. Vance McAllister.I'm putting my money that Fox will acknowledge he's there - maybe even interview him. The MSM mouth-breathers will either totally ignore him, or use it as an opportunity to further denigrate him, his father, and their beliefs.
I'm guessing it will be the latter.
Gawd, I hope he comes dressed in cammo...
---
Huh? In California?!
How did some common sense sneak its way into California?
An interesting lawsuit went to non-jury trial in a Los Angeles court room yesterday; nine public school students, with the support of an educational non-profit called “Students Matter,” are suing the state of California over teacher tenure laws and other protections, which they argue prevent school administrators from removing dysfunctional teachers from the system.The idea of tenure is a good one, when used as originally intended. It was designed for teachers of controversial subjects. Politics, religion, philosophy, etc., where the head of a school would fire a teacher for espousing views contrary to theirs. Controversial ideas need to be brought out in the open so they can be discussed, challenged and considered.
Instead, tenure morphed into a Job For Life guarantee. Put in the requisite number of years, and you become a Teflon Teacher - little can be done to remove you regardless of your actions - or inaction.
Try getting that kind of guarantee in the private, non-union sector. The don't exist. Why would you reward someone solely on the basis of their time-in-job?
This attitude is another reason why unions - outside of those in government - continue to decline in membership.
Back in my banking days, I had a number of major unions as customers. Including certain California unions that represented teachers.
These guys play rough. They will throw TONS of dollars at this to get it defeated. If they lose in court, they'll get their buddies in Sacramento to write new laws in their favor.
Same ol', same ol'...
---
Copyright 2014 Bison Risk Management Associates. All rights reserved. Please note that in addition to owning Bison Risk Management, Chief Instructor is also a partner in a precious metals business. You are encouraged to repost this information so long as it is credited to Bison Risk Management Associates. www.BisonRMA.com
Monday, January 27, 2014
Preps For California Gun Owners
 |
| Flag of the Late, Great State of California |
A bunch of years ago, the state - in its infinite wisdom to promote a safe and secure state - decided that not all pistols were worthy of sale in California. Manufacturers had to submit their guns for testing to make sure they met the standards set by some gun-grabber in Sacramento.
Fine. The manufacturers submitted their guns, and they got on The List. Make it on The List, and your guns could be sold to all lowly state citizens.
To further safeguard the life and liberty of our citizens, in 2007, the state then decided that we'd all be safer if all semi-autos imprinted the gun's serial number on each and every spent cartridge. Supposedly, this would help law enforcement catch the bad guys (Yeah, like they use registered guns).
The problem was, the technology to do this microstamping didn't exist. The genius' in Sacramento knew this, so they put it in the law that as soon as the technology was certified as viable, the law would kick in.
Apparently, in the opinion of the soft-heads in Sacramento, it's now viable, so our state attorney general blessed it, and in mid-2013, the law fell into place. The effect was that any new gun, or a current one that has a "material upgrade," needed to incorporate this new microstamping technology to be included on The List.
Just after the law kicked in, Ruger made a change to their SR-22. It's a small, fun semi-auto that shoots .22LR cartridges. They made some minor change to the slide.
 |
| Banned, Evil Plinker In California |
Ruger told Sacramento to pound sand -
Ruger® SR22® pistol no longer certified for sale in California.
Effective July 26, 2013, the Ruger SR22 pistol (Model Number 3600) was removed from the Roster of Handguns Certified for Sale in California and, as a result, these pistols may not be legally sold there. This decision was due solely to a routine manufacturing change to the slide (unrelated to the function or performance of the pistol) that, under the law in California, may require re-testing. We are continuing to manufacture and ship SR22 pistols as before, though not for sale in California.
Anticipating your question, we do not know when the SR22 pistol will again be available in California, but we will advise you when it is.God Bless them.
- Ruger Firearms
Since then, other manufacturers have done the same thing -
Sorry, California Glockaholics: No Glock 41 or Glock 42 for you.
Smith & Wesson to Sell Fewer Guns in Calif. Over Microstamping Law
Way cool. The Big Three have told California to shove it.
---
What does this mean to Californian gun owners and buyers? It depends.
If you want the newest, safest models of semi-autos, you're not gonna get them in this state. And don't think that you can get around it by buying the gun online and having it shipped here. The local FFL that takes delivery must certify that the gun is on The List before they can hand it over.
Good luck getting your money back from the out-of-state seller. Maybe the FFL will let you witness the gun's destruction as is required by California law.
What if you own an older model semi-auto that was on The List when you bought it? I asked the gun range where I taught a class this weekend that very question.
If the gun is still on The List when you want to sell it, no problem. If it has come off the list - like the SR22 has come off - you can either turn it over to the state for them to destroy or you can try and sell it to an out-of-state buyer via your local FFL (you can do outgoing sales of banned guns, but not incoming purchases).
Can I see a show of hands from anyone that thinks that guns not on The List will see a marked price drop when being sold by someone in California? Kinda got ya by the short-hairs, don't they?
Can I see another show of hands from anyone that thinks this trend will soon be applied to all guns sold in California?
Oh, and guns sold and used by law enforcement are not included in this requirement to make The List. Does that mean that - per California law - those guns are unsafe? If so, and a LEO uses one, should they and their departments be held liable for using an unsafe weapon?
BTW, if Ruger, S&W or Glock continue to sell guns to California LEOs, they'll never sell another one to me.
Accept The Challenge
Get out while you can. At least be starting the process.
Our legislature does not want you with guns. Period. In their eyes, you're not able to understand their use and purpose. Only government employees have that ability.
Gun owners as a group, I'd guess, are less likely to be Takers - those on some sort of public assistance. If we all pick up our toys and go elsewhere, the loud sucking sound coming from the state coffers will be heard loud and clear. Stay here, and you're giving your financial support to their ideals.
Everyone left here will be safe, though. And impoverished.
---
Copyright 2014 Bison Risk Management Associates. All rights reserved. Please note that in addition to owning Bison Risk Management, Chief Instructor is also a partner in a precious metals business. You are encouraged to repost this information so long as it is credited to Bison Risk Management Associates. www.BisonRMA.com
Wednesday, January 22, 2014
All Tied Up In Knots

Don't scoff!
No, I don't see myself in a field of bamboo anytime soon, but the knots this guy demonstrates are pretty damned impressive. My only problem is, I don't see a regular use for them. If you don't use them regularly, you're not going to practice them. If you don't practice them, you'll forget how to make them!
I think his demonstration video on the Pipe Hitch (securing the rope to the bamboo stalks) is excellent, but would be seldom used. The Pile Hitch, on the other hand is simple to use and secure. I can see using it to secure a ridgepole for a shelter.
I did a post a number of years back on knots ("Knotty Problems"). In it, I discussed and provided links on how to make and use the five knots I use - and practice - the most: Square knot, Bowline, Trucker's Hitch, Trilene Knot and Surgeon's Loop.
I've got an update for it. I rarely use the Bowline any more. If I need a secure loop, I use the Surgeon's Loop. Brain-dead easy to make, and it never fails.
I've also added a knot: the Tautline Hitch. I have no idea how I left it off the original list, as I use it a lot.
 |
| Photo credit: netknots.com |
Accept The Challenge
It's amazing how often knots are needed. A run to the dumps needs a secured load. Pitch a tent, and you need to ensure it won't come down on your head. Fishing, fishing and more fishing.
I have a monthly alert on my calendar that says, "Practice knots." It's a handy reminder to take a quick run through the knots I want to stay proficient with, but haven't used in a while. I spend perhaps a half hour going through them.
Like most skills, knot tying is a perishable one. Practice makes proficient!
---
Copyright 2014 Bison Risk Management Associates. All rights reserved. Please note that in addition to owning Bison Risk Management, Chief Instructor is also a partner in a precious metals business. You are encouraged to repost this information so long as it is credited to Bison Risk Management Associates. www.BisonRMA.com
Sunday, January 5, 2014
Road Trip Preps

Since this trip started in California, I basically had to head east for the trip (I won't be moving to the socialist-leaning Oregon - the eastern half of the state would be a wonderful option, but all of the political power is in the western part of the state - it's become more of a northern annex of California).
So, I had to prepare for mountains (Sierra Nevadas) and lots of arid desert that is punctuated with towns here and there. Twenty-plus miles between civilization is not uncommon. In short, lots of geographically diverse space to cross, and it could suck badly if you broke down in one of the dead zones.
This article gives suggestions on "15 things that should be in your vehicle during winter" is a good start.
Some of these supplies may save your life.Aside from the road salt, sand and snow chains, my car's Get Home Bag contains all of those items for two adults for three days.
- A shovel
- Windshield scraper and small broom
- Flashlight
- Battery powered radio with extra batteries
- Food and Water for 3 days
- Extra winter layers – hats, socks and mittens
- First aid kit with pocket knife
- Any necessary medications
- blanket(s) and/or bivvy bags
- Tow chain or paracord
- Road salt and sand
- Booster cables
- Emergency flares
- Fluorescent distress flag
- Snow chains
Things I have in addition to these listed items include:
- A pistol with 50 round of ammo, holster and mag pouch
- An AR7 survival rifle (a break-downable .22LR rifle) and 50 round of ammo
- Three means to make fire: Bic lighter, strike-anywhere matches, magnesium fire starter bar; plus Vaseline-soaked cotton balls and dryer lint for tinder.
- A means to purify more water. I have three additional means: purification tablets, a Katadyn Hiker Pro water filter and hiking pot/fire to boil
- A small ax.
- A fixed blade and folding knife.
- A multi-tool
- An 8x10 foot tarp
- Two cans of, "fix a flat"
- Mobile phones
- A 100 yd roll of 550 paracord (I know it was listed in the first list, but I want to make the point that I WAY over-do it with cordage. So many uses.)
- Roll of duct tape
Obviously, gear only gets you part of the way there. You need to know how to use it. So, skills needed include:
- How to change a flat tire
- How to start a fire
- How to build a shelter with the tarp (including knot knowledge) and local materials
- How to find water in arid locations
- How to accurately shoot both of the firearms
- Basic first aid
- How to stop profuse bleeding
Accept The Challenge
If you breakdown in BFE, how well are you going to fare? Are you alone, or with others? How many? What ages and skill sets do they possess? What skills do you possess to keep your name out of the local news reports about, "a body was recovered"...?
The Rule of Threes is one of those things you should keep at the front of your mind:
You can live...
- 3 minutes without air
- 3 hours without shelter (obviously during extreme heat or cold weather - and I consider fire to be a form of shelter)
- 3 days without water
- 3 weeks without food
Prepare and develop skills accordingly...
---
Copyright 2014 Bison Risk Management Associates. All rights reserved. Please note that in addition to owning Bison Risk Management, Chief Instructor is also a partner in a precious metals business. You are encouraged to repost this information so long as it is credited to Bison Risk Management Associates. www.BisonRMA.com
Tuesday, September 17, 2013
Bug Out Plan Update: Guns
About a week ago, we got a public alert notice on our TV to be prepared to evacuate. My area of Northern California has a dominant peak: Mt. Diablo. Well, it had a hell of a fire. Not as big as the Rim Fire near Yosemite or a couple others further north, but it was a bigun.
As soon as we got the alert that we might have to evacuate (about 70 homeowners, ranchers and farmers did have to bug out), I broke out our Evacuation Plan. What? You don't have one? You should be drawn and quartered! Go here for a 3-part post (Part 1, Part 2, Part 3) on how to make your own.
Anyways, part of our plan is, "grab the guns". So I started ticking off - in my mind - the rifles and pistols I wanted to bring, and staged them to be quickly loaded into our vehicle should the evacuation alert turn into a mandatory evacuation order. [BTW, the posts above discuss the concept of tripwires - events or news that happens, which then move you to action. We would have voluntarily evacuated well before a mandatory order had been given, as one of our tripwires - wind direction and speed - would have been tripped earlier. I'm more aggressive in my self-preservation acts than those dictated by government officials.]
It then dawned on me that my wife would not know which to bring, and what needed to come with them. I had a BIG hole in my preps by assuming I'd be home when an emergency hit.
So, in addition to updating the evacuation plan to mention specific guns, I wanted to have something that was fully self-sufficient, and easy to grab.
Ta-da!

Huh? A tool chest?
Yes, but a very special tool chest. First notice the front area just to the right of the yellow latch. It's a lock. A combination lock. Here in the late-great state of California, if you're transporting a gun, it must be in a locked case. I didn't use a keyed lock, because keys get lost. The combo used on this lock is the same combo used on all of our locks.
What you can't see from this picture is a label that says, "FN-P9, 9mm pistol" on the end of the case. In this way, I know all of my stuff needed for that particular gun is in a single case.
This case is a Stanley tool box. It comes with a removable tray, which was removed and discarded, as I want to be able to pile as much crap into this box as is possible.
Here's what you see when you first open up the box -

Everything I need to use and maintain the gun in a bug out situation.

The pistol, 3 magazines, paddle holster, mag pouch, 130 rounds of hollow point ammo (two boxes of 50 each, 3 magazines with 10 each), a universal gun cleaning kit, 225 gun patches, a dozen Remoil gun wipes, and a can of Remoil aerosol.
I believe I will be able to squeeze in another 50-round box and a couple more magazines if I jostle stuff around just right. I think I'll add some Q-tips and a rag as well.
Each pistol I own that might be taken during a bug out now has its own box. If we are forced to evacuate on foot, this still gives me the ability to grab what I need for a particular gun and stuff it into a BOB, and not be searching high and low for a needed item.
The box was $7, cleaning kit was $8, Remoil patches were $4, Remoil spray was $5 and the cleaning patches were $3. It won't cost you an arm and a leg to put these together.
Another thing about this is that it doesn't scream, "GUN!" If we were forced to evacuate and our public servants decided to take an non-Fourth Amendment compliant looksee in my car, it would look like a regular old tool chest used to fix the car. A tacti-cool case and 5.11 gear would be like calling a buzzard to road kill.
Yes, part of our updated plan is to remove all labels from the box as it's placed in the car.
---
More on tripwires: My area of the country is subject to 3 major types of natural disasters: Flooding, earthquakes and wild fires. The tripwires dictate the direction and timing of our evacuation. Flooding - which levees are at risk, where are they in relation to our home, when are high tides? Earthquake - where is major damage to infrastructure, where are bridges? Fire - how close, what direction/speed of wind, in what general direction is the fire burning?
Other tripwires include civil unrest and toxic air releases (I have refineries, power plants and chemical plants all within 15 miles, some within 5 miles, and train tracks within 2 miles).
Accept The Challenge
Putting together an evacuation plan will take you a bit of time, but is well worth the effort. Your neck of the woods may be concerned with hurricanes or tornadoes. Perhaps ice storms or a nuclear power plant emergency.
The point is, every place in this country is subject to some sort of event that could result in the need (or order) to evacuate. Your success in dealing with - and recovering from - such an event is predicated upon the idea that you will do everything in your power to not become dependent upon the good graces of some government agency for your well-being.
Go read the three linked posts on putting a plan together. Ensure the 12 Impacts are all addressed. Tweak and upgrade when needed.
Go on, git! You've got some work to do!
---
Copyright 2013 Bison Risk Management Associates. All rights reserved. Please note that in addition to owning Bison Risk Management, Chief Instructor is also a partner in a precious metals business. You are encouraged to repost this information so long as it is credited to Bison Risk Management Associates. www.BisonRMA.com
As soon as we got the alert that we might have to evacuate (about 70 homeowners, ranchers and farmers did have to bug out), I broke out our Evacuation Plan. What? You don't have one? You should be drawn and quartered! Go here for a 3-part post (Part 1, Part 2, Part 3) on how to make your own.
Anyways, part of our plan is, "grab the guns". So I started ticking off - in my mind - the rifles and pistols I wanted to bring, and staged them to be quickly loaded into our vehicle should the evacuation alert turn into a mandatory evacuation order. [BTW, the posts above discuss the concept of tripwires - events or news that happens, which then move you to action. We would have voluntarily evacuated well before a mandatory order had been given, as one of our tripwires - wind direction and speed - would have been tripped earlier. I'm more aggressive in my self-preservation acts than those dictated by government officials.]
It then dawned on me that my wife would not know which to bring, and what needed to come with them. I had a BIG hole in my preps by assuming I'd be home when an emergency hit.
So, in addition to updating the evacuation plan to mention specific guns, I wanted to have something that was fully self-sufficient, and easy to grab.
Ta-da!

Huh? A tool chest?
Yes, but a very special tool chest. First notice the front area just to the right of the yellow latch. It's a lock. A combination lock. Here in the late-great state of California, if you're transporting a gun, it must be in a locked case. I didn't use a keyed lock, because keys get lost. The combo used on this lock is the same combo used on all of our locks.
What you can't see from this picture is a label that says, "FN-P9, 9mm pistol" on the end of the case. In this way, I know all of my stuff needed for that particular gun is in a single case.
This case is a Stanley tool box. It comes with a removable tray, which was removed and discarded, as I want to be able to pile as much crap into this box as is possible.
Here's what you see when you first open up the box -

Everything I need to use and maintain the gun in a bug out situation.

The pistol, 3 magazines, paddle holster, mag pouch, 130 rounds of hollow point ammo (two boxes of 50 each, 3 magazines with 10 each), a universal gun cleaning kit, 225 gun patches, a dozen Remoil gun wipes, and a can of Remoil aerosol.
I believe I will be able to squeeze in another 50-round box and a couple more magazines if I jostle stuff around just right. I think I'll add some Q-tips and a rag as well.
Each pistol I own that might be taken during a bug out now has its own box. If we are forced to evacuate on foot, this still gives me the ability to grab what I need for a particular gun and stuff it into a BOB, and not be searching high and low for a needed item.
The box was $7, cleaning kit was $8, Remoil patches were $4, Remoil spray was $5 and the cleaning patches were $3. It won't cost you an arm and a leg to put these together.
Another thing about this is that it doesn't scream, "GUN!" If we were forced to evacuate and our public servants decided to take an non-Fourth Amendment compliant looksee in my car, it would look like a regular old tool chest used to fix the car. A tacti-cool case and 5.11 gear would be like calling a buzzard to road kill.
Yes, part of our updated plan is to remove all labels from the box as it's placed in the car.
---
More on tripwires: My area of the country is subject to 3 major types of natural disasters: Flooding, earthquakes and wild fires. The tripwires dictate the direction and timing of our evacuation. Flooding - which levees are at risk, where are they in relation to our home, when are high tides? Earthquake - where is major damage to infrastructure, where are bridges? Fire - how close, what direction/speed of wind, in what general direction is the fire burning?
Other tripwires include civil unrest and toxic air releases (I have refineries, power plants and chemical plants all within 15 miles, some within 5 miles, and train tracks within 2 miles).
Accept The Challenge
Putting together an evacuation plan will take you a bit of time, but is well worth the effort. Your neck of the woods may be concerned with hurricanes or tornadoes. Perhaps ice storms or a nuclear power plant emergency.
The point is, every place in this country is subject to some sort of event that could result in the need (or order) to evacuate. Your success in dealing with - and recovering from - such an event is predicated upon the idea that you will do everything in your power to not become dependent upon the good graces of some government agency for your well-being.
Go read the three linked posts on putting a plan together. Ensure the 12 Impacts are all addressed. Tweak and upgrade when needed.
Go on, git! You've got some work to do!
---
Copyright 2013 Bison Risk Management Associates. All rights reserved. Please note that in addition to owning Bison Risk Management, Chief Instructor is also a partner in a precious metals business. You are encouraged to repost this information so long as it is credited to Bison Risk Management Associates. www.BisonRMA.com
Monday, September 2, 2013
Some Projects For You To Labor Upon
Happy Labor Day, by the way....
Maybe a couple of these ideas found at Instructables.com will click in your head as a way to make a couple of bucks on your way to developing a second stream of income, or to help your preps be more productive or and less costly.
This is a great example of using a bit of elbow grease and only a little bit of money to seriously upgrade and improve an existing pile of crap.
This smoker went from this $5 garage sale find:

To this - dare I say - smokin' work of art:

Think you could make a couple of bucks selling this?
If you've got some welding skills and a bit of artistic flare, this Instructable details how to turn a bit of square tubing and flagstone into some remarkable - and unique - tables.

Based on the information in the Instructable, the materials for this table cost less than $50. That's an easy $500 table, and some of them online go for north of a thousand bucks.
Perhaps you're like me and you work with wood. So make an oak base!
On the prepper's side, one of the big contributors to Instructables is this guy named the King Of Random. This guy is unreal. He has posts on everything from homemade stuff that goes 'boom' to a post like this that shows you how to very easily make a water pump from PVC pipe.


Finally, this last one is a big time saver for those of you with gardens. Many of you may already know of this trick, but it's a new one to me.
Get your seeds to sprout faster - as in overnight - by abusing them!
Using a technique called, "scarification", you remove part of the seed hull before you apply water for them to sprout -

He claims he gets a 60% overnight success rate....

Now, get a-laborin'!
---
Copyright 2013 Bison Risk Management Associates. All rights reserved. Please note that in addition to owning Bison Risk Management, Chief Instructor is also a partner in a precious metals business. You are encouraged to repost this information so long as it is credited to Bison Risk Management Associates. www.BisonRMA.com
Maybe a couple of these ideas found at Instructables.com will click in your head as a way to make a couple of bucks on your way to developing a second stream of income, or to help your preps be more productive or and less costly.
This is a great example of using a bit of elbow grease and only a little bit of money to seriously upgrade and improve an existing pile of crap.
This smoker went from this $5 garage sale find:

To this - dare I say - smokin' work of art:

Think you could make a couple of bucks selling this?
If you've got some welding skills and a bit of artistic flare, this Instructable details how to turn a bit of square tubing and flagstone into some remarkable - and unique - tables.

Based on the information in the Instructable, the materials for this table cost less than $50. That's an easy $500 table, and some of them online go for north of a thousand bucks.
Perhaps you're like me and you work with wood. So make an oak base!
On the prepper's side, one of the big contributors to Instructables is this guy named the King Of Random. This guy is unreal. He has posts on everything from homemade stuff that goes 'boom' to a post like this that shows you how to very easily make a water pump from PVC pipe.


Finally, this last one is a big time saver for those of you with gardens. Many of you may already know of this trick, but it's a new one to me.
Get your seeds to sprout faster - as in overnight - by abusing them!
Using a technique called, "scarification", you remove part of the seed hull before you apply water for them to sprout -

He claims he gets a 60% overnight success rate....

Now, get a-laborin'!
---
Copyright 2013 Bison Risk Management Associates. All rights reserved. Please note that in addition to owning Bison Risk Management, Chief Instructor is also a partner in a precious metals business. You are encouraged to repost this information so long as it is credited to Bison Risk Management Associates. www.BisonRMA.com
Tuesday, May 29, 2012
Quick Release Scope Mount Review
It's been a bit hectic lately. Lots of balls in the air!
A product review: I purchased an NC Star Quick Release Scope Mount from OpticsPlanet.com [link]. What these things do is, they allow you to mount your scope to the Mount, then attach the Mount to your Weaver rail. The idea is, you then zero in your scope and you are able to then quickly remove the Mount when you're done. The next time you need to use that gun/scope combination, you simply snap the Mount to your Weaver rail, and you're already pre-zeroed.
In theory.

A problem I've been having is storing my gun in its case. If I have either of my scopes - red-dot or hunting - it won't fit into the case. Sux.
So, I wanted to be able to quickly switch between scopes and not have to re-zero every time.
This Mount costs right around $35. I'd seen them upwards of $400, and wasn't going to spend that kind of money, at least not until I'd given a cheap one a try. Plus, I'd read dozens of favorable reviews about the NC Star mount.
NOTE: The mount comes with NO INSTRUCTIONS. Idiots. Thankfully, a bunch of the reviews had noted this. There is only one tricky thing you need to be worried about - it has to do with a set screw and nut. Just go slowly, and you'll be fine.
Anyways, I got the bad boy mounted. I was using my Kel-Tec SU-16CA (5.56mm) with a very inexpensive BSA 4x12 power scope (under $100). At home, I chambered a "laser cartridge" to pre-zero the scope. I wanted to at least be in the vicinity when I started sending real rounds down range.
[BTW, I got one of the NC Star AR Riser and Quick Release Weaver Mount [link] at the same time for my red-dot scope. $25.]
I got to the range and initially set up at 50 yards. The proverbial "broad side of a barn" was not at risk (more on that later). Finally got it zeroed, and moved the target out to 100 yards.

The Kel-Tec has an integrated bi-pod, which I used. I was seated at a table. The rifle was then shouldered and supported by my forearms under the stock.
The first shot at at 100 yards was down at 5 o'clock in the 8 ring. Adjusted the elevation and windage. Second shot was at 10 o'clock, also in the 8 ring. Elevation adjusment brought it down to the 9 o'clock position in the 9 ring. Windage adjustment put me in the 10 ring (don't remember which shot). Took 3 more shots, all in the 10 ring.
I then removed the Quick Release Mount, then re-attached it. Four more shots in the 10 ring! [BTW, this is an 8" target, with the 10 ring having a diameter of 2 1/2 inches].
The mount worked as publicized.
---
The target was one of three I had mounted on a 2-foot by 2-foot piece of cardboard. The targets were placed in a evenly spaced diagonal row from the upper left hand corner down to the lower right hand corner. The target shown above was in the lower right hand corner.
When I was trying to zero in at 50 yards, as I noted above, I couldn't find the target. This, despite the fact that I had supposedly pre-zeroed the scope (at 15 yards) at home with the laser cartridge.
I was firing at the center target. If you notice on the image above, I have one of the hole patches at about 10:30 in the 8 ring. THAT was from my shots at the center target!
---
Copyright 2012 Bison Risk Management Associates. All rights reserved. Please note that in addition to owning Bison Risk Management, Chief Instructor is also a partner in a precious metals business. You are encouraged to repost this information so long as it is credited to Bison Risk Management Associates. www.BisonRMA.com
A product review: I purchased an NC Star Quick Release Scope Mount from OpticsPlanet.com [link]. What these things do is, they allow you to mount your scope to the Mount, then attach the Mount to your Weaver rail. The idea is, you then zero in your scope and you are able to then quickly remove the Mount when you're done. The next time you need to use that gun/scope combination, you simply snap the Mount to your Weaver rail, and you're already pre-zeroed.
In theory.

A problem I've been having is storing my gun in its case. If I have either of my scopes - red-dot or hunting - it won't fit into the case. Sux.
So, I wanted to be able to quickly switch between scopes and not have to re-zero every time.
This Mount costs right around $35. I'd seen them upwards of $400, and wasn't going to spend that kind of money, at least not until I'd given a cheap one a try. Plus, I'd read dozens of favorable reviews about the NC Star mount.
NOTE: The mount comes with NO INSTRUCTIONS. Idiots. Thankfully, a bunch of the reviews had noted this. There is only one tricky thing you need to be worried about - it has to do with a set screw and nut. Just go slowly, and you'll be fine.
Anyways, I got the bad boy mounted. I was using my Kel-Tec SU-16CA (5.56mm) with a very inexpensive BSA 4x12 power scope (under $100). At home, I chambered a "laser cartridge" to pre-zero the scope. I wanted to at least be in the vicinity when I started sending real rounds down range.
[BTW, I got one of the NC Star AR Riser and Quick Release Weaver Mount [link] at the same time for my red-dot scope. $25.]
I got to the range and initially set up at 50 yards. The proverbial "broad side of a barn" was not at risk (more on that later). Finally got it zeroed, and moved the target out to 100 yards.

The Kel-Tec has an integrated bi-pod, which I used. I was seated at a table. The rifle was then shouldered and supported by my forearms under the stock.
The first shot at at 100 yards was down at 5 o'clock in the 8 ring. Adjusted the elevation and windage. Second shot was at 10 o'clock, also in the 8 ring. Elevation adjusment brought it down to the 9 o'clock position in the 9 ring. Windage adjustment put me in the 10 ring (don't remember which shot). Took 3 more shots, all in the 10 ring.
I then removed the Quick Release Mount, then re-attached it. Four more shots in the 10 ring! [BTW, this is an 8" target, with the 10 ring having a diameter of 2 1/2 inches].
The mount worked as publicized.
---
The target was one of three I had mounted on a 2-foot by 2-foot piece of cardboard. The targets were placed in a evenly spaced diagonal row from the upper left hand corner down to the lower right hand corner. The target shown above was in the lower right hand corner.
When I was trying to zero in at 50 yards, as I noted above, I couldn't find the target. This, despite the fact that I had supposedly pre-zeroed the scope (at 15 yards) at home with the laser cartridge.
I was firing at the center target. If you notice on the image above, I have one of the hole patches at about 10:30 in the 8 ring. THAT was from my shots at the center target!
---
Copyright 2012 Bison Risk Management Associates. All rights reserved. Please note that in addition to owning Bison Risk Management, Chief Instructor is also a partner in a precious metals business. You are encouraged to repost this information so long as it is credited to Bison Risk Management Associates. www.BisonRMA.com
Sunday, February 12, 2012
Mobile vs Immobile Foods

I'm a list guy - love 'em - as they help to keep you on track and focused. Most of the lists were heavy on canned goods. This is fine for in-home storage, but can be problematic for food you want with you while you're on the move. Especially if your back and legs are the primary means of transport.
I'll use my Get Home Bag (GHB) as an example. It is packed with food, water and equipment to sustain two people for 3 days. That means, at the bare minimum, it needs to hold 12,000 calories (two thousand calories times two people times three days). I want densely packed, light-weight foods. This leaves more room for water, fire, shelter and defense provisions in the bag.
Notice, I used the words, "sustain" and "bare minimum" as part of my description. We're not talking about "living large" here. The purpose of this bag is to get us home - probably by foot. We'd most likely burn more than the 2,000 calories each per day, but when we arrived home, we wouldn't be looking like refugees from Somalia.
For this purpose, Survival Bars are the best choice. The Mayday brand bars [link] run about $3 for a 2400 calorie bar, or $1.25 per 1000 calories. Personally, I've got the Millennium Energy Bars [link] which run about $10 for ten, 400 calorie bars, or $2.50 per 1000 calories. I prefer this more expensive alternative because they come in smaller individual sizes (easier to gauge the amount eaten) and each bar is a different flavor. The smaller size also makes it easier to use for barter or charity. Both brands have a 5-year life.
All of these bars have other benefits as well. They require no preparation - water, fuel, utensils - and they can be eaten while on-the-move. With both types of bars, they are manufactured to be "low water intake" nutrition - you don't need excessive amounts of water for your body to digest the nutrients.
---
One step up - with regards to flavor, at least - are dehydrated and freeze dried foods. I keep somewhere in the range of 40,000 calories worth of these foods in my car as well. The idea for these foods is some sort of car breakdown in a remote area - mountains or desert. This would provide two people with food for another ten days or so.
These foods are light, but they're more bulky. And they can be VERY expensive per 1000 calories ($10-$11 in some cases). Shop around and do the math, as deals can sometimes be found.
Personally, I make my own much less expensively. Check out our series of Just Add Water [link] posts.
The 'downside" is that you need to be able to heat water. This means the need for fuel (indigenous or brought with you), a way to make fire (you had better have that covered anyways!) and some sort of container in which to boil the water. We're not talking about putting together a Martha Stewart kitchen, but you'll need more than what's in your GHB.
For me, I have a box in my trunk with these, "Medium-Term Survival" foods and tools.
Accept The Challenge
When you're putting your various lists together, don't pigeon-hole yourself into thinking one product type will fit all of your needs. Take off the blinders and consider which foods are best for different situations.
If you're able to wait things out in your home - as most of us plan - those heavy, immobile, low-cost, easy-to-prepare foods are great. More bang for the buck.
But we need to assume we'll have to go mobile - the whole, "best laid plans go all to hell" deal. You DON'T want to be lugging around 3 cases of canned tuna fish on your back. Weight is a huge factor when thinking about mobility.
Water for two people weighs around 16 pounds for one day. It's heavy and bulky, but you've got to have it. Be sure to have filters (I use the Katadyn Hiker Pro) and lots of purification tablets so you can turn crap water into potable water.
---
Copyright 2012 Bison Risk Management Associates. All rights reserved. Please note that in addition to owning Bison Risk Management, Chief Instructor is also a partner in a precious metals business. You are encouraged to repost this information so long as it is credited to Bison Risk Management Associates. www.BisonRMA.com
Subscribe to:
Posts (Atom)